


This guide is intended to help people add picons to their Enigma2 receiver.
As always, if you know another way, please continue to use the method you are comfortable with.
I have tried to word it so that as many people as possible can understand and follow it.
If you think it can be improved, please say so in the discussion thread.
For the sake of simplicity, let us deal with the activation of picons first.
There are various screens on the image.
Picons will need to be enabled on some of these screens.
Infobar:
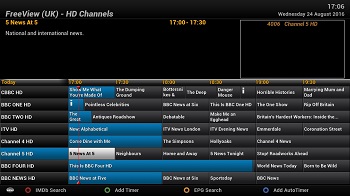
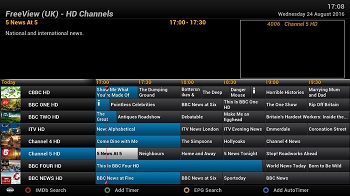
Picons will show on the infobar automatically once you have added them.
This is the default for normal skins on almost every image.
If they do not show, this is the first indication of an error.
Note: Some skins have deliberately stopped this.
To enable picons on the infobar, you have to edit some skin files.
Read the write-up before applying such skins.

Graphical EPG:
The picons are disabled in the Graphical EPG screen by default.
To enable them, access the Graphical EPG settings menu.
Menu > Setup > System > EPG > Graphical EPG settings > Service title mode > scroll down to Service Title mode
(Quicker access to the menu: EPG > Menu > > scroll down to Service Title mode)
Change the setting so that it shows “picon and service name”. You can also select “picon only”.
Use the left/right buttons on the remote to change between the options.
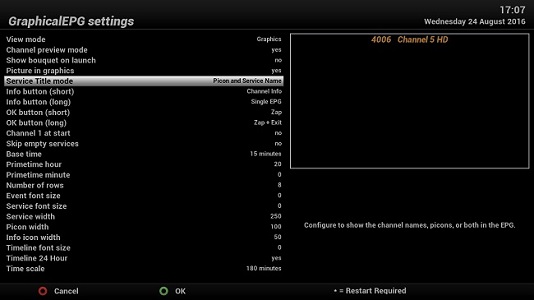
Your picons should then be displayed
Service list:
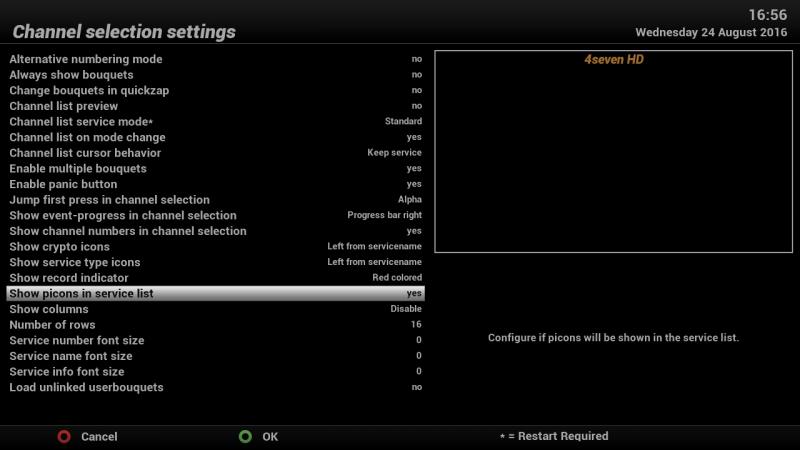
The picons are disabled in the service/channel list by default.

Some people like to see picons next to the channel name, others do not. The choice is yours.
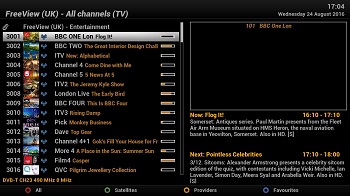
To enable them, you have to access the Channel Selection Settings menu
Menu > Setup > System > Channel selection settings > scroll down to Show picons in service list
(Quicker access to the menu: Channel Up > Menu > Settings > scroll down to Show picons in service list)
Change the setting so that it shows “yes”. Use the left/right buttons on the remote to change between the options.
Note:
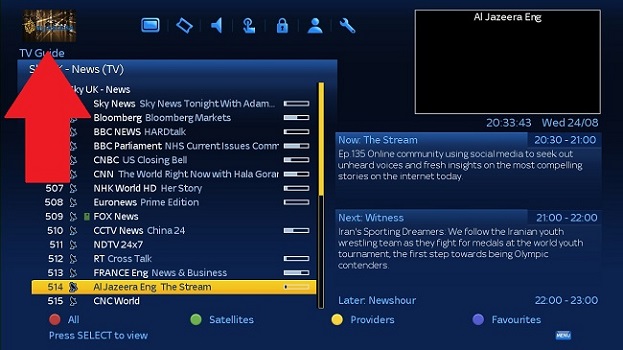
On some skins, there is a dedicated place for picons.
On such skins, the picons are displayed for the highlighted service automatically.
The default skin (Vix Night HD) in OpenVix does not have this.
Some receivers have a Front Display Panel.
There are two types, the black and white ones (Ultimo, Uno, LX3, Mutant 2400 etc) as well as the Colour LCD ones (GD Quad Plus, Solo 4K etc).
You can display picons on them too.
The receivers with B&W FDPs need specific picons.
Normal picons look poor on them.
If you do not have the lcd_picon folder, normal ones will be used.
These displays have skins that affect what information is displayed on them.
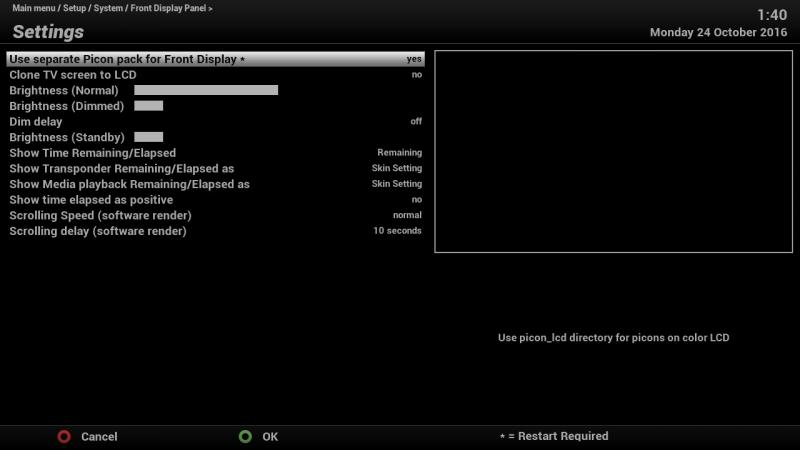
The default skin for the Front Display Panel (FDP) does not show them. To change this, do the follwoing:
Menu > Setup > System > Front Display Panel > Skin Setup
The FDP skins with previews will be shown to you. Select the one with picons and then save. Receiver will need to be restarted, confirm this when prompted.
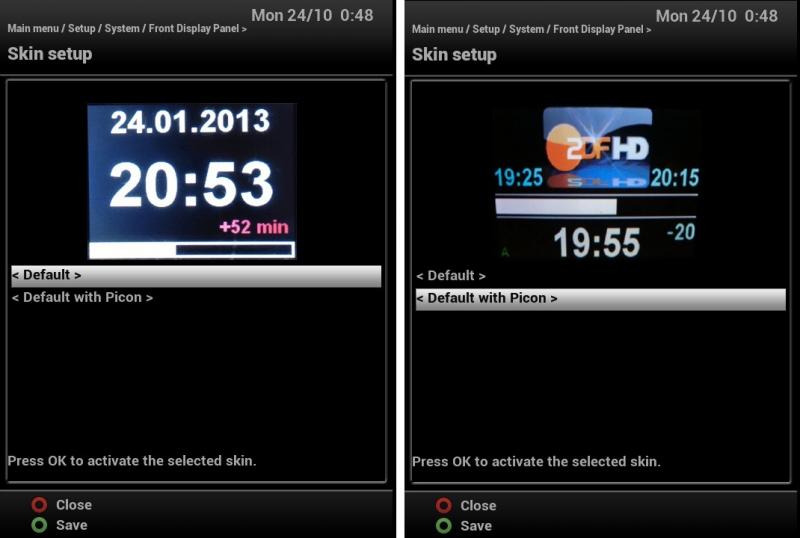
Picons will be shown as specified in the skin (after adding them of course).
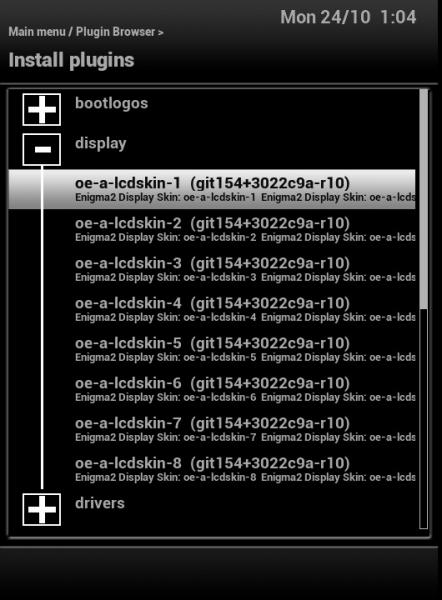
So, you have picons showing, but want to have them full screen?
As mentioned before, the skin determines the display.
You have to install a different skin.
Try them and use the one you like.
Menu > Plugins > Green (download plugins) > Scroll down to display > Press OK to expand > select the one you want (in this example it is oe-a-lcdskin-1) > Press OK > Confirm the installation.
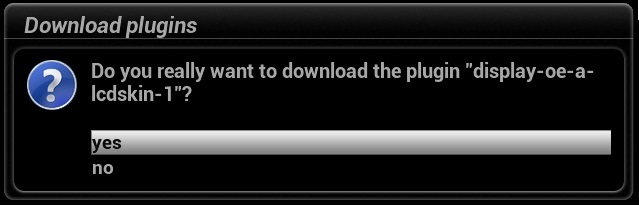
Exit out of menus.
The skin is now installed and can be selected as mentioned above.
I deliberately did not mention the skin installation earlier as it is a separate process.
Using one set of picons on TV and another on Colour Front Display Panel
The default option is to have just the one set of picons.
There are some who would like to have one type of picon on the TV and vibrant ones on the FDP.
This is possible from Openvix 4.2 009.
The separate picons must be stored in a folder called "lcd_picon" on the root of your storage device (not in another folder).
As these picons are usually large (150+ MB) you may wish to store them on a USB flash drive.
To enable the alternate location:
Menu > Setup > System > Front Display Panel > Settings > Change the option to Yes > Green for OK
A restart is required for the change to take effect.
Let us move on to adding picons to the receiver.
There are two methods of adding picons:
- Installation
- Transfer
Installation method:
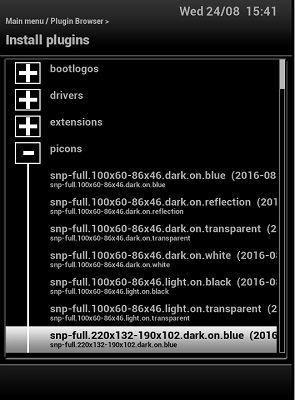
Method 1A. Installing picons from the plugin server.
Menu > Plugins > Green (download plugins) > Scroll down to picons and expand > Scroll to your preferred one
(In this example, it is dark on blue. Use the SNP version)
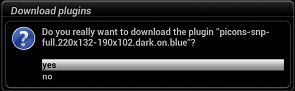
In the next step, you will be asked where to install the picons.
Your choices will be explained below.
You are only asked the location when installing picons from the plugin download servers.
You can only select the storage devices that are in a Linux file system.
Devices initialised/formatted by the receiver will use a Linux file system, "ext 4".
If you have a fat32 USB flash drive connected, you will not see this as an option!
Restart the receiver after you install the picons.
This is because the picon folder is selected during startup.
If you have more than one picon folder on your system, only one will be used.
You will need to look at the debug log to see which location has been selected.
More details in the removal and troubleshooting section.
Picon Storage:
Internal flash memory:
This is the fastest location to use.
This is suitable for most picon packs from the server as the package size is relatively small.
You will lose the picons when you flash the receiver with another image. This is because the internal flash memory is overwritten.
To avoid confusion, I said “flash”, not “update”.
- When you perform an online update, the picons on internal flash memory will not be lost.
- If you flash/install an image using a USB stick or ImageManager/Ofgwrite, the picons on internal flash memory will be lost.
Some people are concerned about unnecessary read/write operations to flash memory. If you are concerned about this, don’t use the internal flash memory.
USB flash drive:
Just to repeat, when installing picons from plugin menu, you will only be offered this location if your device uses a Linux file system. If you initialised (formatted) the USB drive using the receiver, it will be in a Linux file system. You can transfer picons to a USB flash drive, irrespective of the filesystem it uses.
Picons on a USB flash drive will survive an image install. This is the second fastest location.
Note: If you only have one storage device connected, it will be mounted as /media/hdd.
When people say not to use a HDD for picons, they are referring to a mechanical Hard Disk Drive. They are not referring to USB flash drives, thumb sticks or whatever name you want to use for them.
Mechanical HDD:
Most people have these installed for recordings and also use for EPG data. Picons will survive an image install. However, the HDD has to spin up to access the picons so there is a usage issue there.
If you have set timeshift to start automatically, your mechanical HDD is constantly spinning, so the spin up issue does not apply to you.
Method 1B. Installing an ipk:
This is not a common method of adding picons. I’m covering it for the sake of completeness. The picons will be installed to the directory that the installation package is made as. They are generally made to install onto the flash memory. You cannot select the location.
Download your ipk. You can download from picons.xyz if you want.
Transfer it to the /tmp directory on receiver
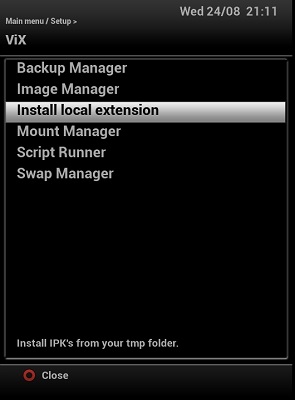
Blue > Vix > Install local extension > if only one ipk is present it will be highlighted, otherwise scroll down to the one you want to install > Press OK or green to install
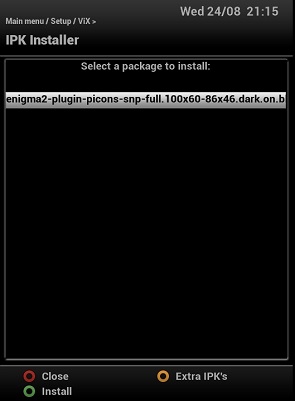
Highlight the ipk and press OK

Confirm the installation
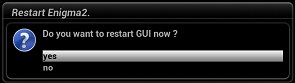
Restart the GUI/Enigma2 after the installation
Note: This is a method of installing any ipk, not just picons.
Transferring picons
You can also transfer picons to your receiver.
Before we go into detail, let us understand the following:
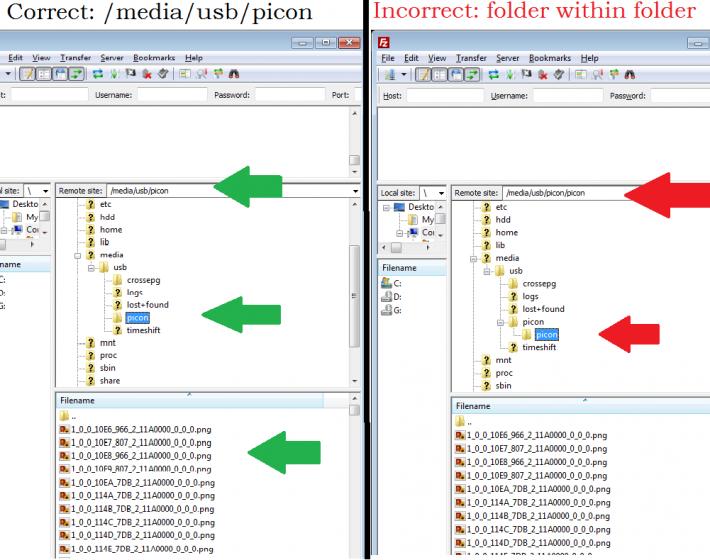
Folder name:
The picons must be in the folder called “picon”.
The receivers use a Linux operating system.
Linux is case sensitive, windows is not.
Linux will see the following as two different folders, Windows treats them as if they are the same.
/media/usb/picon This is correct
/media/usb/Picon This is incorrect
Common mistakes:
Wrong folder names. Following are all wrong “Picon”, “Picons”, “picons”
Location:
You can use the following locations:
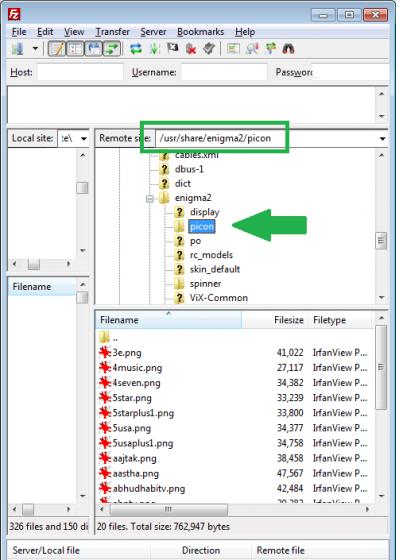
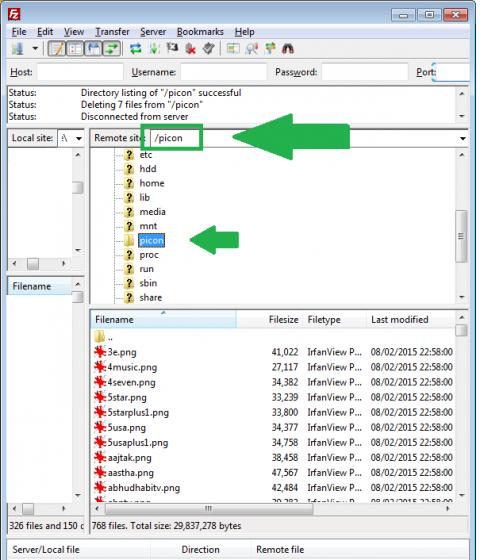
/picon
/media/hdd/picon
/media/usb/picon
/media/cf/picon
/usr/share/enigma2/picon
(Or “picon” folder on root of storage device)
If you put them in a sub-folder (folder within a folder), they will not show!
Here are some screenshots to explain
Most people who transfer picons download the picons from forums.
There will be updates on the following forum:
Method 2A. Using a USB flash drive
Download your picon pack and extract/unzip/unrar the contents.
All the pictures/picons must be put in a folder called “picon”.
Just to repeat what was said earlier, not “Picon” nor “picons”
If you also use the USB flash drive for EPG, shut down your receiver properly then disconnect the USB stick.
Most receivers support deep standby, so select that as the shutting down option.
Connect the USB stick to your PC/Laptop. Transfer the “picon” folder to the USB flash drive.
Do not put the “picon” folder into another folder.
Safely remove/eject the USB flash drive and remove from PC.
Connect the USB flash drive to the satellite receiver and then start the receiver.
Method 2B. Using an FTP client
From time to time, you will need to transfer files to the receiver.
Best to learn how to do this.
Make an image backup if you are afraid you will mess things up.
You can flash your backup image If you make a mistake.
Install your chosen FTP client program.
Be cautious of what you click when installing.
Depending on where you download from, you get bundled rubbish.
The receiver must be connected to the same network as your receiver.
There is no need for a direct connection between the receiver and PC/Laptop.
You will need the receiver’s IP address.
To find this out,
Menu > Information > Network
Using FileZilla as an example,
Host = Receiver’s IP address
Username = root (Not “Root”. Remember Linux is case sensitive!)
Password = Leave this blank unless you created a password. There is no password on image by default
(Some FTP clients will not connect without a password. In which case use anything you want).
Port = Leave this blank. (FYI: It will be port 21 unless you changed it)
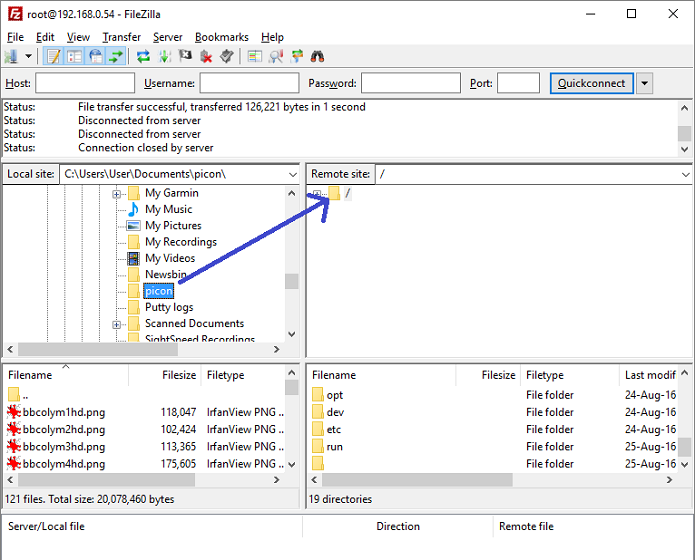
When you open FileZilla, it will look like this.
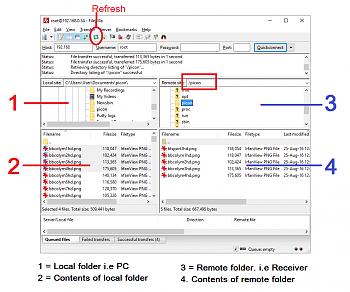
Info:
Window 1 shows the folder you are working with on PC.
Window 2 will show what is in that folder on PC.
Window 3 shows the folder you are working with on the Receiver.
Window 2 will show what is in that folder on the Receiver.
Whatever you double click in 2 will be sent to 4.
Whatever you double click in 4 will be sent to 2.
However, it is easier to drag and drop, especially if you have lots of files to transfer.
Time for action!
In window 1, select the location where your picon folder is located.
In window 3, click at the very top. All the folders should be closed. As you can see on address bar (red arrow), no folders are selected.
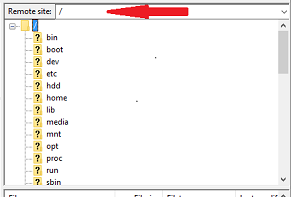
Select the picon folder in window 1. Drag it to window 3 and let go.
Make sure you do not access/go into any other folder.
Adding/Replacing picons
When you need to top up/add to your picon collection, window 2 should be your updated picons. Expand/open the picon folder in window 3.
It can be any of the locations mentioned earlier.
Drag and drop the picons you want from window 2 to window 4.
You will be prompted to overwrite if there is an existing file.
Removal/Uninstallation
The process of removing picon packs depends on how you added them.
If you had installed them…
You should uninstall them.
Menu > Plugins > Red (remove plugins) > scroll down to picons > select the one you want to remove > Press OK.
You will be prompted to confirm the uninstallation
If you had transferred…
Easiest way to remove the whole picon set is to use the FTP program. Right click on the “picon” folder and then delete it.
Transferring another set of picons overwrites the existing ones. As mentioned earlier, you will be prompted to overwrite.
If you want to try a different set, you may wish to rename the existing folder to something different.
As an example, you could name the folder “picon_mk”. To reinstate usage of this folder, rename it back to “picon”
Some extra information….
Conventional picons, (service reference picons)
These are named after the service reference of the channel. This is an example of a name:
1_0_1_C743_96B_2_11A0000_0_0_0.png
Service references change from time to time, so picon names also need to be updated when the changes occur.
Service Named Picons (SNPicons)
These were introduced by the ViX team and have been incorporated into most images.
The picons are named after the service name.
As channel names do not change often, the picons will need fewer updates.
They also show for all channels with the same name, whatever their reference.
They show whether a service is on any satellite, terrestrial or cable.
SNPs do not override SRPs. They can exist in the same folder, SRPs take precedence.
Please note: Ocram uses shared resources. You will get a clash when installing more than one of his picon sets.
The conditions are:
Replace “*” with “star”
Replace “&” with “and”
Replace “+” with “plus”
Only letters a-z and numbers 0-9 are allowed
Everything must be lowercase
LraiZer’s AutoBouquets 28.2
People who use the plugin sometimes have issues with picons. They normally enable the add number to name feature and find picons are no longer visible. This can be made to work, you must say you are using the plugin.
LraiZer’s plugin also supports the SNPs. If you add the number to the name, the service name changes and the required picon name also changes, e.g. “bbconelon” will become “101bbconelon”.
You can make the SNPicons work by using the “Create AutoPicon Links” feature. Set this to “ServiceNamePicons”. The links must be created on the same folder as the picons and be a Linux file system.
If you have a problem, when asking for help, say that you are using the plugin and post a screenshot of your AB 28.2 settings page.
AB 28.2 can also use conventional picons. It renames them and creates links. The link location must be on a Linux file system. As most people use SNPs, best not to use this feature.
Simple answer for users of AB 28.2 who want to use SNPicons
Ensure the "add number to name" feature is disabled on AB 28.2
You can still enable the numbers through settings in most images apart from Graphical EPG
There is no need to enable AutoPicon in AB 28.2
Complicated answer for users of AB 28.2 who want to use SNPicons and "Add Number to Name"
Picons must be on an ext file system device
Enable AutoPicons within AB 28.2
Links and picons must be on the same device
In the link option select SNPicons
Troubleshooting
Hopefully the guide above will avoid any issues. If you need to ask for assistance on the forum, you will get better help if you post as much information as possible.
1. Search the forum for existing threads.
2. Enable the debug log and then upload it to your post.
To enable the debug log:
Menu > Setup > System > Logs > Settings > Enable debug logs
Change this to yes using the left/right button.
You will need to restart the receiver for the logs to be generated.
You can see/change where you want debug/crash logs to be sent to in this screen too.
Default location is /home/root/logs
(How to add attachments covered in point 4 below)
If you have more than one picon folder, there is no definite way for receiver to pick which folder is used. Your debug log will show which folder is being used.
A picture is worth a thousand words! Maybe you can explain your problem better with a picture?
See this guide on how to take a screenshot and attach it to your thread.


